This library of books, audio, video, and other materials from and about India is curated and maintained by Public Resource. The purpose of this library is to assist the students and the lifelong learners of India in their pursuit of an education so that they may better their status and their opportunities and to secure for themselves and for others justice, social, economic and political.
This item has been posted for non-commercial purposes and facilitates fair dealing usage of academic and research materials for private use including research, for criticism and review of the work or of other works and reproduction by teachers and students in the course of instruction. Many of these materials are either unavailable or inaccessible in libraries in India, especially in some of the poorer states and this collection seeks to fill a major gap that exists in access to knowledge.
For other collections we curate and more information, please visit the Bharat Ek Khoj page. Jai Gyan!
THE INDIAN ROADS CONGRESS
1984
IRC Special Publication 25
Published in July 1984
(The Rights of Publication and Translation are reserved)
Published by
The Indian Roads Congress
Copies can be had by V.P.P. from the Secretary,
Indian Roads Congress,
Jamnagar House,
Shahjahan Road,
New Delhi-110 011
Price Rs.80/-
(Plus Packing & Postage )
NEW DELHI 1984
Edited and Published by Ninan Koshi, Secretary, Indian Roads Congress, New Delhi. Printed at PRINTAID, New Delhi-110 020.
Members of the Highway Construction and Mechanization Committee
| 1. | G. Viswanathan (Convenor) |
Chief Engineer (Mechanical), Ministry of Shipping & Transport |
| 2. | J.K. Dugad (Member-Secretary) |
Superintending Engineer (Mechanical), Ministry of Shipping & Transport |
| 3. | V.M. Bedse | Chief Engineer, P.W.D. Maharashtra |
| 4. | R.S. Bhatti | Superintending Engineer, Rajasthan P.W.D. |
| 5. | M.L. Dhawan | Managing Partner, Industrial & Commercial Corporation, Amritsar-143 004 |
| 6. | B.L. Dutta | Superintending Engineer (Mech.) P.W.D. Roads, West Bengal |
| 7. | S.K. Gupta | Superintending Engineer (Mechanical), P.W.D. B & R., Haryana |
| 8. | V.P. Gangal | Superintending Engineer, New Delhi Municipal Committee |
| 9. | V.P. Kamdar | Managing Director, Gujarat State Construction Corporation Ltd. |
| 10. | S.K. Kelavkar | General Manager (Marketing), Marshall Sons & Co. India Ltd., Madras |
| 11. | S.B. Kulkarni | Chief Consumer & Bitumen Manager, Indian Oil Corporation Ltd., Bombay |
| 12. | M.R. Malya | 3, Panorama, 30, Pali Hill Road, Bombay-400 052 |
| 13. | Somnath Mishra | Superintending Engineer, Orissa P.W.D. |
| 14. | J.F.R. Moses | Technical Director, Sahayak Engineering Pvt. Ltd. Hyderabad |
| 15. | P.M. Nadgauda | Pitri Chhaya, 111/4, Erandavane, Pune-411 004 |
| 16. | K.K. Nambiar | "RAMANALAYA", 11, First Crescent Park Road, Gandhinagar, Adyar, Madras |
| 17. | G. Raman | Director (Civil Engg.), Indian Standards Institution |
| 18. | G. Rath | Superintending Engineer, Orissa P.W.D. |
| 19. | S.S. Rup | Scietist, Central Road Research Institute |
| 20. | Satinder Singh | Superintending Engineer, Punjab P.W.D. |
| 21. | O.P. Sabhlok | Chief Engineer, Himachal Pradesh P.W.D. B&R |
| 22. | Joginder Singh | Superintending Engineer, Haryana P.W.D., B&R |
| 23. | S.P. Shah | Tata Engineering & Locomotive Co. Ltd., Bombay-400 023 |
| 24. | H.N. Singh | Superintending Engineer (Mech.) P.W.D, Bihar |
| 25. | Prof. C.G. Swaminathan | Director, Central Road Research Institute (Retd.) |
| 26. | L.M. Verma | Superintending Engineer (C), Directorate General Border Roads |
| 27. | Sushil Kumar | Director (PR), Directorate General Technical Development, Govt. of India, Ministry of Industry |
| 28. | R.K. Khosla | Asst. General Manager (Mining), Bharat Earth Movers Ltd. Bangalore |
| 29. | M.N. Singh | Chief Manager (PM), Indian Road Construction Corporation, New Delhi |
| 30. | Brig. Jagdish Narain | Chief Engineer, Udhampur Zone, P.O. Garhi, Udhampur—182121 |
| 31. | The Director General (Road Development) & Addl. Secretary to the Govt. of India—Ex-officio | |
Members of the Working Group
| 1. | G. Viswanathan | ... | Chief Engineer [Mechanical], Ministry of Shipping & Transport |
| 2. | Lt. Col. C.T. Chari | ... | Superintending Engineer, E-in-C Branch, Army Headquarters |
| 3. | J.R. Cornelius | ... | Superintending Engineer, Highways & Rural Works, Tamil Nadu |
| 4. | N.K. Jha | ... | Executive Engineer (Mechanical), Ministry of Shipping & Transport |
| 5. | U. Mathur | ... | Britannia Engineering Co. |
| 6. | V.B. Pandit | ... | Chief Engineer (Mechanical), Maharashtra |
| 7. | S.S. Rup | ... | Scientist, Central Road Research Institute |
| 8. | V.K. Sachdev | ... | Executive Engineer (Mechanical), Ministry of Shipping & Transport |
| 9. | S.S. Yechury | ... | Superintending Engineer (Mechanical), Ministry of Shipping & Transport |
The art of compaction as the key to increased strength and improved performance were know to man since early ages. This technique has since been refined and perfected with the use of road rollers. Today in the field of road construction road rollers hold the key not only to quality construction but also improved maintenance, helping in the creation of durable assets.
To meet the growing needs of traffic, there is a persistent demand to add new lengths to our existing road network and strengthen or widen the important arterial routes. The task is colossal and the funds inadequate calling for the highway engineers to utilise their ingenuity in meeting the demands. Road rollers play a vital role in accomplishing this task and in order to get the maximum return from the existing fleet of road rollers through systematic and timely maintenance under well trained operators and mechanics is a must.
In keeping with this need, the Indian Roads Congress through its Highway Construction and Mechanization Committee has prepared guidelines with essential tips on operation, maintenance and repair of road rollers. These guidelines were approved by the Executive Committee and the Council in their meetings held on the 7th December, 1983 and the 8th January, 1984 respectively.
It is hoped that this document would serve as an useful guide to the Highway Engineers engaged in road construction.
K.K. SARINNew Delhi
July, 1984
Different types and capacities of road rollers are required for different job-specifications depending upon the type of soil, moisture content, lift thickness and output. These include smooth wheeled rollers, which are more commonly used, pneumatic tyred rollers, vibratory rollers, tractamount rollers and sheeps foot rollers. Though a particular type may have a few special features/components like pneumatic tyres, vibrating mechanism etc., most of them have several common features like :
prime mover (Generally diesel engine)
power transmission system (clutch, gear box, differential, etc.)
control system
frame/chassis
As such, the general maintenance aspects to be considered for one type of roller are not very different from others.1
Hullo !
You are interested in putting extra life into your road roller. Thats why you have started reading this manual. Well thats half the battle won. Now don't put this down unless you have some urgent reason to do so. This is no ordinary compendium of facts and figures. It has been specially written for you, an overworked operator, for you, a tired technician, for you, a harassed supervisor and you, a busy manager.
Much money has been spent on the purchase of your roller. If it keeps running, the investment is worthwhile. If it is idle due to any reason, your project suffers. If it is damaged and idle, the project suffers even more. Repairs are always costly and time consuming. Remember, neglect causes more failures than honest wear.
We can help you run your roller without trouble, without tears and that too, with no extra effort. Interested? Well, read on.2
Do carry out the maintenance instructions.
Do read the engine maker's instruction book.
Do make sure you are using the correct grades of fuel and lubricating oils.
Do use clean fuel and lubricating oil.
Do keep the correct level of engine oil in the air cleaner.
Do keep battery topped up to correct level.
Do check all oil levels and grease points regularly.
Do check adjustment of brakes, clutches and fan-belt regularly.
Do lock up starter switch when leaving roller unattended.3

DON'T leave water in radiator or tank during cold weather, if in freezing zone.
DON'T attempt to change gear unless clutch hand-lever is in centre position.
DON'T leave roller in gear with engine running unattended.
DON'T try to engage automatic decompressor while engine is running.
DON'T leave the differential lock engaged after wheel slip has been eliminated.
DON'T leave Kigass fuel open after engine has started.
DON'T shut fuel supply tap when stopping engine.
DON'T leave roller unattended without applying hand brake, use stops while parking on inclines,
DON'T allow any unauthorised person to climb into drivers cabin.
DON'T move roller without releasing brakes.
DON'T march the roller on own power to work sites beyond 25 km. It should be transported on trailer/truck.
DON'T stop roller during rolling to avoid occurrence of indentation.4
You start work each morning and before the roller goes for duty, it would be time well spent if you ensure that these points are acted upon:
By the time you finish work for the day, the roller would have operated for eight to ten hours. Before you go off duty, it is essential that these points are acted upon :
Thats no exaggeration, believe us. The emphasis is on periodicity, which is every :
These could vary somewhat depending on the make of the machine, but that is no big worry. Let's look at each of the Periodic Tasks.
Note : The hourly schedule of maintenance prescribed above needs implementation and it must be ensured. A check sheet has been provided at the end of this book for recording the same and should be checked by inspecting officers.7
| (i) | General | : | (a) Check oil, water or fuel for leaks. |
| (b) Check for exhaust smoke colour, noise, or vibration, | |||
| (c) Check all bolts and nuts, joints and connections, if loose or deficient. | |||
| (d) Read all guages and meters. | |||
| (ii) | Engine sump | : | Check and top up oil. |
| (iii) | Transmission | : | Check oil level and top up. |
| (iv) | Fuel tank | : | Drain sediments and water from sediment trap drain plug, |
| (v) | Fuel filter | : | Drain sediments and water from sediment drain plug, |
| (vi) | Cooling system | : | (a) Top up coolant level. |
| (b) Check fan belt, adjust tension or replace. | |||
| (vii) | Air filter | : | Keep oil level up to groove in level. Use new engine oil. |
| (viii) | Final drive | : | Check for oil leaks and rectify, |
| (ix) | Oil pressure | : | Check oil pressure. Normal working pressure is (40 to 60 psi) 2.8 to 4.2 kg/cm2 |
| (x) | Dynamo charge | : | Check dynamo charge rating.8 |
| (xi) | Lubricating Points | ||
| a) Differential shaft bearing | : | Oil | |
| b) Hind roll bushes | : | Oil/Grease | |
| c) Front roll bushes | : | Oil/Grease | |
| d) Clutch shaft bearing | : | Grease | |
| e) Brake shaft | : | Oil/Grease | |
| f) Trunion pinion rear | : | Oil/Grease | |
| g) Universal joints | : | Grease | |
| h) Steering head | : | Remove cap nut, add a few drop of oil into hole in stud | |
| i) Steering worm gear | : | Oil/Grease | |
| j) Clutch side and operating fork | : | Oil/Grease | |
| k) Fuel drive pinion | : | Oil | |
| l) Engine control | : | Clean mud or dust from all working pins and pivots, of all controls and operating rods, and lubricate using oil can. | |
|
(i) Service air cleaner at earlier intervals under adverse working conditions. (ii) Check all bolts, nuts, set screw and split pins where fitted, including engine, gear box transmission and fore-carriage. (iii) After the days work fill Driver's Log book as in the proforma provided at the end of this book.9 |
|||
| (i) | General | : | Carry cut 8 hours task. |
| (ii) | Fuel pump chamber | : | Drain the fuel pump chamber (or when the fuel spills from the tell tale hole). |
| (iii) | Battery | : | Top up to ¼" (6 mm) above plates with distilled water. |
| (iv) | Sliding ballast weight | : | Check rope for tensions and rope grips for tightness. |
| (v) | Lubricating Points | ||
| (a) Starting handle shaft | : | Oil | |
| (b) Starting spindle | : | Oil | |
| (c) Clutch driver and casing | : | Pour a little oil in one of the four holes in clutch casing also into one of the two holes in clutch drivers. | |
| (d) Steering worm bearing | : | Grease | |
| (e) Hydro steering ram lever | : | Oil | |
| Note : After attending to the maintenance enter the date of maintenance in maintenance check sheet.10 | |||

| (i) | General | : | Carry out 8 hours and 60 hours tasks. |
| (ii) | Fuel filter | : | Change the filter elements. |
| (iii) | Engine oil | : | Change engine oil and filters if working under adverse conditions.11 |
| (i) | General | : | Carry out 8 hours, 60 hours and 125 hours tasks |
| (ii) | Lubricating oil filter | : | Replace filter. |
| (iii) | Fuel filter | : | Remove drain plug at bottom of filter bowl and allow fuel to flow through until clean fuel appears. Replace drain plug. |
| (iv) | Prefilter | : | Remove bowl and clean. |
| (v) | Dynamo | : | Refill grease cup on dynamo. |
| (vi) | Water pump belt drive | : | Fill greate cup. |
| Note : Inspect drained engine oil for metal particles. If any found, suggest holding unit to report to workshop immediately. DONOT RUN ENGINE TILL RECTIFIED.12 | |||
| (i) | General | : | Carry out 8, 60, 125 and 250 hours tasks. |
| (ii) | Engine oil sump | : | Drain, remove sump and clean strainer. |
| (iii) | Lubricating oil filter | : | Change element. |
| (iv) | Injector | : | Remove injector and test set injector pressure. |
| (v) | Transmission | : | Remove top cover and inspect for : |
| (a) Oil supply from sump to gears | |||
| (b) Correct meshing of bevel gears | |||
| Notes : |
(i) Change oil filter early hours under adverse working condition. (ii) No attempt should be made to adjust the injection pressure without a proper testing equipment.13 |
||

| (i) | General | : | Carry out 8, 60, 125, 250 and 500 hours tasks. |
| (ii) | Engine | : | Decarbonise and inspect valve. Remove cylinder head and examine inlet and exhaust valve. Grind in valves as required. Decarbonise cylinder head, tops of pistons and exhaust manifold. Clean out water spaces in cylinder head. |
| (iii) | Fuel pump | : | Check and calibrate if necessary. |
| (iv) | Valve and tappet clearance | : | Adjust valve and tappet clearance when the engine is hot as per engine manufacturers recommendations. |
| (v) | Spill timing | : | Check timing. |
| (vi) | Cooling system | : | Flush out the system. |
| (vii) | Starter and generator | : | Inspect commutator and brush and carry out necessary repairs.14 |
| (viii) | Gear box | : | Drain oil and refill. |
| (ix) | Water sprinkler | : | Inspect pump (if fitted) for smooth functioning and clean filter element. |
| (x) | Lubricating Points | ||
| (a) Starter motor | : | Oil | |
| (b) Dynamo | : | Grease | |
| Notes : | (i) Inspect drained gear oil for metal particles. If any found, suggest checking by mechanic. DO NOT RUN THE MACHINE TILL RECTIFIED. (ii) Do not attempt to adjust the FIP and governor in the absence of proper testing equipment.15 |
||
| (i) | General | : | Carry out 8, 60, 125, 250 and 500 hours tasks. |
| (ii) | Engine | : | (a) Check the general mechanical condition of the road roller and report/rectify if any defect in engine or transmission. (b) Check engine oil pressure and cylinder compression. (c) Clean all lubricating pipes thoroughly with flushing oil. |
| (iii) | Fuel tank | : | Thoroughly clean out fuel tank and gauze strainer.16 |
| (i) | General | : | Carry out 8, 60, 125, 250, 500 and 1000 hours tasks. |
| (ii) | Clutch coupling | : | Clean and grease splines withdrawing splined tailpiece. |
| (iii) | Check engine compresssion. If required remove cylinder head, check cylinder bore and if necessary replace new cylinder liner and piston ring. | ||
| (iv) | Examine main and big end bearing, refit or review if required.17 | ||
The right grades are imperative. Check that your fuel dumps have the right grade stored in well marked containers. Make sure you are using the grade specified by the manufacturer. We think this general guide should help you :
| Engine, Air Cleaner | ||
| Above 30°C | : | SAE 30/HD 30 |
| 0°C to 30°C | : | SAE 20/HD 20 |
| Below 0°C | : | SAE 10W/HD 10 |
| Transmission | ||
| Above 30°C | : | SAE 140/HD 140 |
| Below 30°C | : | SAE 90/HD 90 |
| Grease | ||
| Above 15°C | : | Grease No. 2 |
| 15°C to 10°C | : | Grease No. 1 |
| Below 10°C | : | Grease No. 0 |
Multipurpose grease is also suggested, so as to eliminate separate storing of three different types of grease.18
Life and Property. Rules observed and enforced contribute to safety. They are :
| SL. NO. | TROUBLE | POSSIBLE CAUSE | METHOD OF ELIMINATION |
|---|---|---|---|
| 1. | Slipping of clutch | a) Worn clutch plate lining | a) Adjust distance between the clutch and pressure plate. |
| b) Oiled clutch plate lining | b) Flush kerosene in the clutch plate and allow it to dry. | ||
| 2. | Frequent and sharp knocks in power transmission | Broken gear teeth | Disassemble gear box and replace broken gears by new ones. Remove broken teeth from casing if any. |
| 3. | Speed cannot be changed | Defective gear shifting mechanism | Inspect gear shifting mechanism and adjust. |
| 4. | Front rolls do not turn | a) Jamming in worm transmission | a) Adjust the worm transmission. |
| b) Damaged bearing | b) Replace damaged bearings by new ones.20 | ||
| 5. | Brake does not hold roller on the gradient | a) Worn brake shoe lining | a) Replace brake shoe lining. |
| b) Loose brake shoe fixing | b) Tighten fixing. | ||
| 6. | Increased or decreased clearance between sections of front rolls | Wearing plate out of adjustment | Adjust wearing plate. |
| 7. | Scrapers do not clean rolls | a) Defective fixing of scraper blades | a) Fix properly. |
| b) Worn blades | b) Replace blade by new ones. | ||
| 8. | Sprinkling water does not flow on to the rolls | a) Lack of water | a) Fill the sprinkler tank with water. |
| b) Soiled communications | b) Scavenge communications. | ||
| 9. | Head lights do not operate or light dimly | a) Burnt out head light bulbs | a) Change bulbs. |
| b) Damaged wiring | b) Repair the wiring. | ||
| c) Switch inoperative | c) Repair the switch.21 |
| SL. NO. | TROUBLE | POSSIBLE CAUSE | METHOD OF ELIMINATION |
|---|---|---|---|
| 1. | Engine fails to start | Electric starting | |
| Engine will not rotate | a) Low battery, loose starter connections or faulty starter | a) Replace or repair as necessary | |
| b) Defective starter motor switch | b) Replace | ||
| c) Internal seizure | c) Hand crank the engine at least one complete revolution. If engine cannot be rotated through a complete revolution, internal damage is indicated and the engine must be disassembled to ascertain the cause of seizing. | ||
| Engine turns over freely but does not fire | No fuel is injected into the cylinder | Check for air leaks, flow obstructions, faulty fuel pump or faulty installations. Check for water in fuel; if found, drain the system till all water is eliminated.22 | |
| 2. | Engine fails to come upto speed or engine fails to develop power | Fuel suction pipe of fuel filter clogged | Clean as necessary. |
| 3. | Engine speed is irregular | a) Water in fuel pipes | a) Drain system until all water and dirt is removed. |
| b) Air in fuel system | b) Bleed the fuel system free of air. | ||
| 4. | Engine overspeeds | a) The governor sticks in the full load position | a) Shut down engine at once and inspect governor mechanism for broken or interfering parts. |
| b) The fuel by-pass may be clogged or the mechanism not properly adjusted | b) Shut down engine at once. Inspect fuel by-pass and clean if necessary. | ||
| 5. | Engine stops suddenly | Lack of fuel Air lock in fuel system, sticking valves in fuel supply pump, lines blocked with scale or dirt or fuel filters clogged. |
Correct as necessary. |
| Water may be present in fuel. | Drain system until there is assurance that all dirt and water are removed. | ||
| 6. | Smoky exhaust | Engine is overloaded. (Overloading not only increases the maintenance cost but also shortens the life of the engine) | Reduce the load.23 |
| NOTE : | The relation between the colour of the smoke and the conditions responsible for the same are : | ||
| White smoke | a) Low combustion temperature which occurs with a low compression pressure. b) White smoke due to steam may be caused by water leaking into system. |
||
| Grey smoke (light grey to black) | Result of poor combustion due to causes mentioned above. | ||
| Bluish smoke | Indicates burning or lubricating oil, or due to fuel oil impinging on the walls of combustion chamber due to plugged up fuel nozzle holes. | ||
| 7. | Overheating of the engine | a) Flow of cooling water is insufficient | a) Increase flow |
| b) If water circulating pump is belt-driven, belt is slipping | b) Adjust belt | ||
| c) Lubricating oil is poor dirty or diluted with oil | c) Renew oil | ||
| d) Clogged lub. oil filters | d) Filters must be cleaned and elements replaced where needed. | ||
| 8. | Engine begins to vibrate | a) Loose anchor bolts | a) Tighten nuts of foundation or mounting bolts. This should be done periodically. |
| b) One cylinder is missing | b) Locate missing cylinder and eliminate cause.24 | ||
| 9. | Water in crank case | a) Cracked cylinder head | |
| b) Leaky cylinder head gasket | |||
| c) Cracked or leaky cylinder liner | Do necessary repairs | ||
| d) Lower seal of liner is leaking25 | |||
The unit may be a jeep, a pick-up or a truck. For rugged terrain, a 4-wheeled drive unit is preferable. It should have a good set of hand tools, sledge hammer hydraulic jack, tow cable, etc.
The service unit normally comprises the following :
Air compressor to supply high and low pressure air for tyre inflation and other purposes.
High pressure air operated grease dispenser pumps for pressure greasing. (Three hand grease guns for each group of 10 machines could also be kept as stand-by).
Three low pressure air operated oil dispenser pumps for light-medium oils. These pumps are mounted on drum sleeves suitable for accommodating standard 45 gallon capacity drums.
Hose reels. Six reels are mounted at the rear of the unit to accommodate hoses for various services. These reels are provided with brake device to prevent uncoiling during transit.
Hoses. These are reinforced, oil and grease resisting rubber hoses.
Drawers for spare adopters and drip trays.
Sheet iron trays, say about 60 cm square and 10 cm deep for use when draining the oil sump, washing filter elements, etc.26
10 litres, 5 litres and 1 litre, ½ litre measures with pour spouts for filling fuel and oil,
oil cans.
Funnels with strainers for fuels and lubrication oils,
A working table fitted with a bench vice.
STAFF
A team of five persons, including a senior person, namely, Chargeman or Foreman, is normally recommended. This will include a driver and a two or more lube men. It may take 10 to 15 minutes only for the maintenance work to be done on one machine with a mobile service unit, if this work is properly organised,
FUNCTIONS
It is suggested that :
The Unit move as per a planned programme.
Special Lubricants/Grease which may not be available in the field, be carried.
The Unit carry fast moving spares like fan belts, clamps, hoses, filters of various types, etc. so that these can be replaced on-site.
The Unit carry out periodical adjustments/checks like fan belt, brake and clutch free play, tappet clearance, efficiency of injector, etc. and record the same in the log book of the roller.
The Unit carry out preventive repairs in addition to checking maintenance.
The Unit act as a watch dog on maintenance and serviceability of rollers in the sector of responsibility.27
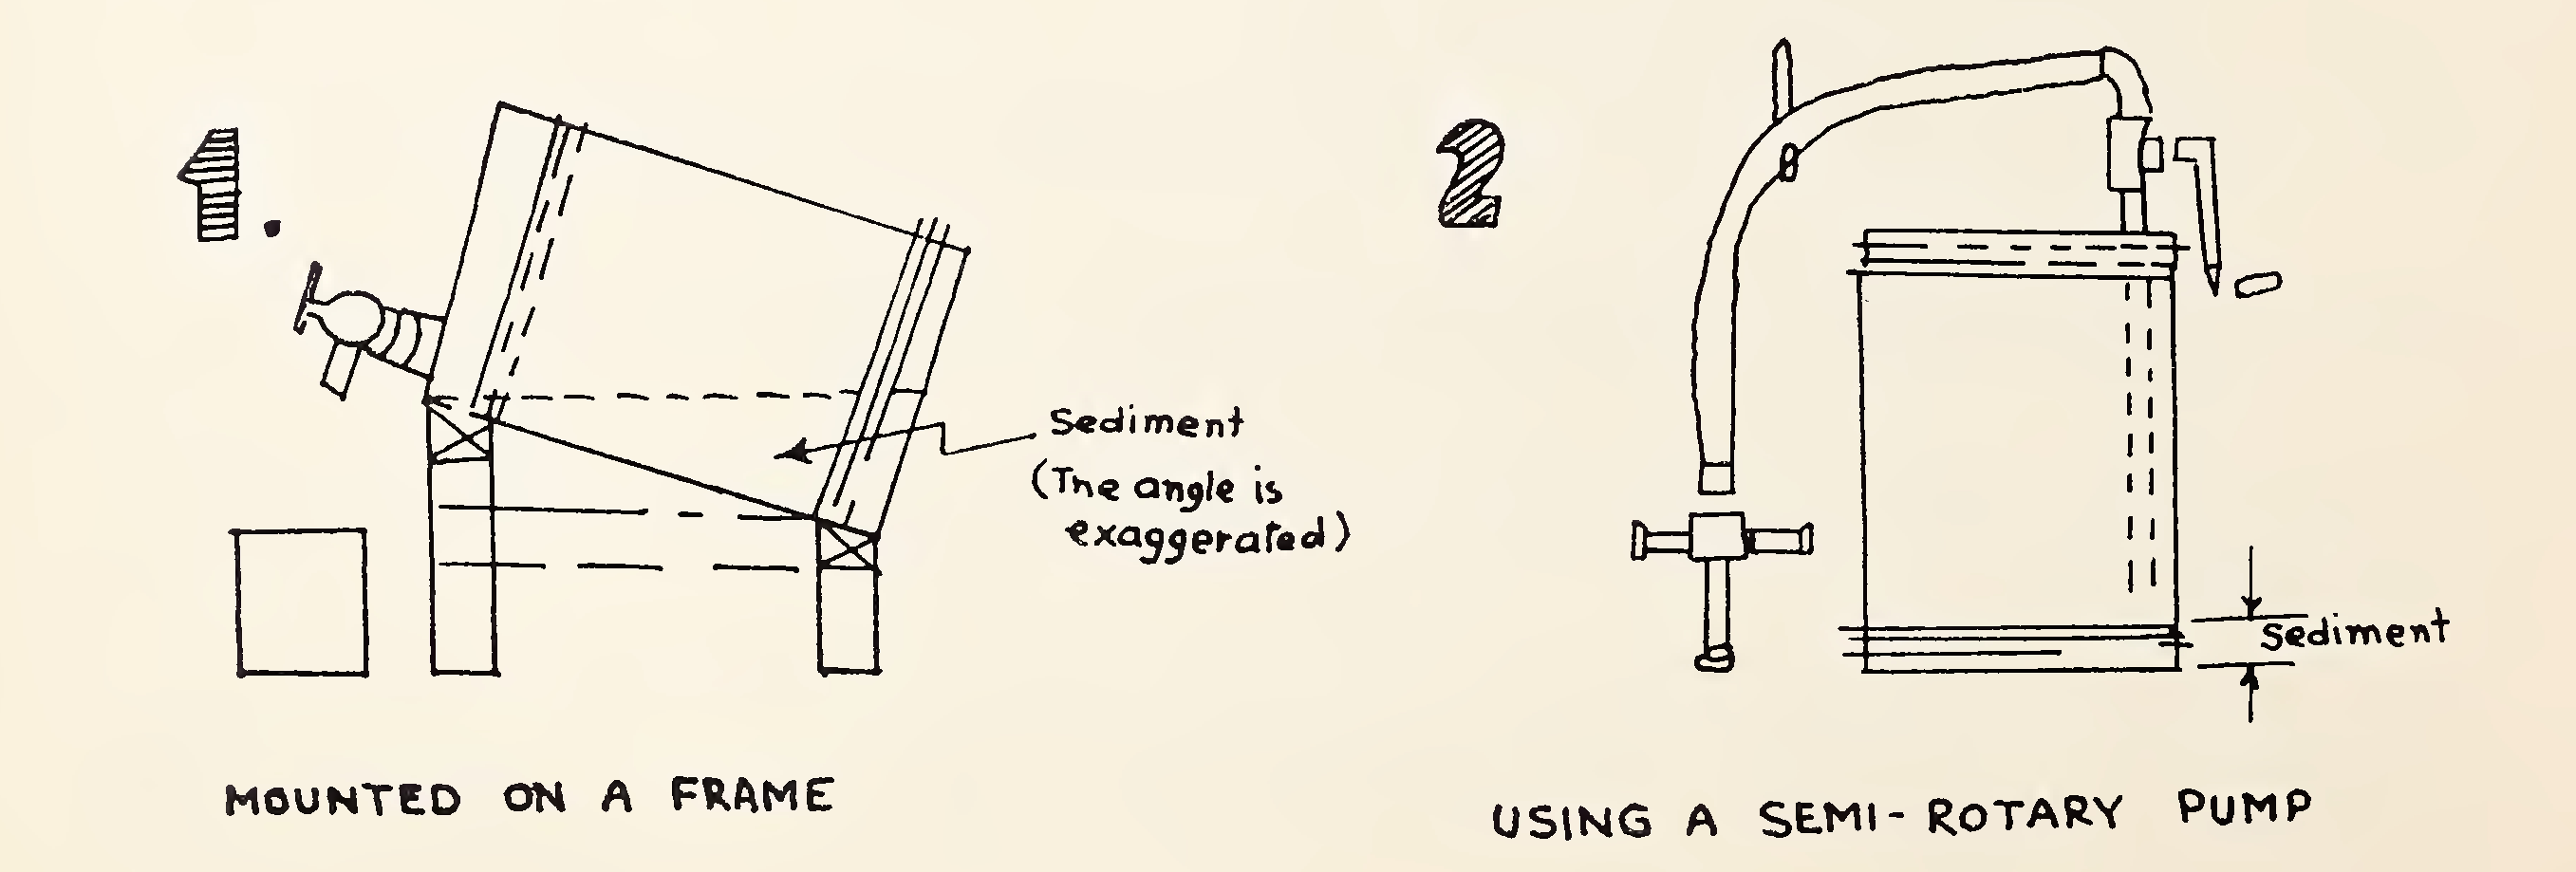
It is necessary that diesel oil is stored in a storage tank and all the sediments are allowed to settle for 24 hours before it is pumped out into the fue tank of the machine. In case of rollers, the storage tank may be 45 gallons barrels and the pumping done with the help of semi-rotary hand pump with filter fitted near the outlet. In no case the buckets and funnels should be used for refuelling in the field.
Two suggested methods for mounting the drums properly are given below :
 28
28
Now let us talk to the most important man on the compaction job — yes, you, the roller operator. Remember, this manual is compiled to help you fulfill your responsibility towards greater durability and better quality. So read this you must, and benefit you will, in the very vital task that you are required to perform.
Roads must be smooth, safe for traffic, durable, economical and provide a comfortable ride. Materials and mixes alone do not guarantee quality and precision. What is the use of good stone, of the best asphalt, of the most accurate laboratory technique, of the most advanced mixing equipment if at the end, incorrect rolling is applied and compaction is poor. Therefore, compact correctly with suitable rollers and apply proper rolling procedures. This will guarantee level and durable surfaces. Remember, everything depends on your skill and care when putting your machine to work.
Before starting on a new job, think about the following :
| Number of passes | ? |
| Rolling speed | ? |
| Rolling pattern | ? |
Let's discuss each of the questions, turn by turn.
The number of passes will obviously depend upon the material to be compacted. Sand and gravel in base and sub-bases will require four to six passes. For bituminous work, this will depend upon the layer thickness.29
25 to 50 mm will require 5 to 8 passes
50 to 100 mm will require 6 to 9 passes
100 to 150 mm will require 6 to 10 passes
The speed of rolling affects the degree of compaction. For a particular level of compaction, the higher the speed, the more the number of passes required. So remember, the rolling speed will depend upon type of mix, thickness of layer, density requirement, surface finish and number of passes. Normally rolling speed would be 5 to 7 km per hr. On a thin hot layer you may run faster—sometimes upto 10 km per hr. Tender mixes, on the contrary, may require very low rolling speeds. On thick layers on harsh mixes a speed of 3 to 5 km per hr is recommended.
Now let's come to the rolling pattern. You must decide on this aspect carefully so that uniform compaction is obtained over the entire width.
If you are rolling gravel, start from the edges and proceed towards the centre, with an overlap of atleast half the width of roller in the longitudinal direction.
If you are rolling macadam, roll from edges with roller runnig forward and backward, until the edges are firmly compacted. The roller is then moved gradually from edge to the centre, parallel to the centre line. The overlapping is done uniformly with rear wheel track by half width and this is continued until the entire area is rolled. There should be no creeping of aggregates visible on rolling.
What follows next is the rolling of bituminous mixes.
Start by compacting the joints, first transverse, then longitudinal. Start by rolling the lowest edge, which generally would also be the outside edge, and roll rest of the pavement running forward and backward in parallel paths with 10 cm to 20 cm overlap.30
Follow the paver as closely as possible, keep running forward and backward in same rolling lane. Change to another rolling lane only on an already compacted area. Turning movements on a hot mix will leave impressions and even lead to cracks. If you have to change speed, do so smoothly. And should you need a break, never park the roller on hot mix—now that's obvious, don't you think ?
Well, rolling of joints requires special care and some expertise. Remember, rolling is always done in the direction of joints.
Unless manoeuvring space prevents transverse rolling, roll transverse to the driveway, the roller so positioned that only 100 mm of the roller is on the uncompacted mix. The major portion of the roller runs on the already finished and cold pavement, going step by step in increments of 10 cm to 20 cm on the new mix until the full width of the drive roll is on the new pavement.
For rolling longitudinal joints you have two options,
The joint could be compacted with the roller working on the cold lane and with a 10 cm to 20 cm overlap on the hot lane, or
The joint could be compacted with the roller working on the hot lane with a 10 cm to 20 cm overlap on the cold lane. This is specially suitable when traffic is heavy and space is restricted.
For finish rolling, run one or two passes on the surface after the asphalt mix is cooled somewhat. Finish rolling is performed only to smooth out the last rolling marks.
And now for some general tips. Should you be on a slope, keep front roll ahead. You must see that during rolling, no interruption occurs due to any reason. When you change direction, let the roller glide to a final stop and then start smoothly into the other direction without loss of time.31
Let's now sum up all that has been said, with ten basic rules :
| ROLLER No. ________________________________ | SUB DIVISION ________________________________ |
| Date | Driver's name | POL USED | TIME | Details of work done | Driver's signature | Signature with designation of the user | Remarks/ remarks of inspecting officer | |||
|---|---|---|---|---|---|---|---|---|---|---|
| Diesel | Engine | From | To | Total hours run | ||||||
| 1. | 2. | 3. | 4. | 5. | 6. | 7. | 8. | 9. | 10. | 11.33 |
| ROAD ROLLER NO ...................................... | NAME OF DRIVER ................................... | SUB DIVISION ..................................... |
| SI. No. | Schedule of maintenance | Date of maintenance carried out | Signature of driver | Signature of Sectional Officer incharge | Signature of S.D.O. Incharge verifying the maintenance every 125 Hrs. and above | Inspecting Officer's remarks with signature and date |
|---|---|---|---|---|---|---|
| 1. | 60 Hrs. Maintenance |
........................ ........................ |
........................ ........................ |
........................ ........................ |
................................................ ................................................ |
........................ ........................ |
| 2. | 125 Hrs. Maintenance |
........................ ........................ ........................ |
........................ ........................ ........................ |
........................ ........................ ........................ |
................................................ ................................................ ................................................ |
........................ ........................ ........................ |
| 3. | 250 Hrs. Maintenance |
........................ ........................ ........................ |
........................ ........................ ........................ |
........................ ........................ ........................ |
................................................ ................................................ ................................................ |
........................ ........................ ........................ |
| 4. | 500 Hrs. Maintenance |
........................ ........................ ........................ |
........................ ........................ ........................ |
........................ ........................ ........................ |
................................................ ................................................ ................................................ |
........................ ........................ ........................ |
| 5. | 1000 Hrs. Maintenance |
........................ ........................ ........................ |
........................ ........................ ........................ |
........................ ........................ ........................ |
................................................ ................................................ ................................................ |
........................ ........................ ........................ |
| 6. | Records of Engine Oil Change |
........................ ........................ ........................ |
........................ ........................ ........................ |
........................ ........................ ........................ |
................................................ ................................................ ................................................ |
........................ ........................ ........................ |
| Note : |
This sheet must be kept with each road roller operator and produced on demand. This sheet provides maintenance check for 1000 Hrs and should be changed as and when complete.34 |
|||||